What to Bake When You Have One Egg, No Butter, and No Patience
 by Max Knutson.
Sometimes the baking gods challenge us: one lonely egg stares back from the fridge, the butter dish is dry, and your patience is already in short supply. But don’t let that stop you — because delicious, grown-up treats are still very much on the table. These clever recipes prove that minimal ingredients and minimal fuss can still result in bakery-worthy bakes. Let’s begin with one of our favorite rich, fudgy shortcuts to dessert bliss.
Olive Oil + Sea Salt Chocolate Tortelets
Minimalist, Mediterranean, and deeply fudgy
These tiny chocolate cakes deliver a deep, rich cocoa flavor with a luxurious texture, thanks to olive oil. A dash of sea salt brings everything into sharp, elegant focus — no mixer, no butter, no stress.

Ingredients:

Instructions:
- Preheat & Prep: Preheat your oven to 350°F (175°C). Lightly grease a mini muffin tin, or line it with parchment squares or mini paper liners to make removal effortless.
- Mix Wet Ingredients: In a medium mixing bowl, whisk together the egg and sugar for about 30 seconds, until the mixture becomes pale and slightly thick. This step helps incorporate a little air and gives a glossier finish. Then pour in the olive oil, cooled coffee, and vanilla extract. Whisk again until everything looks smooth and unified.
- Incorporate Dry Ingredients: Sift in the cocoa powder, flour, and fine sea salt directly into the wet ingredients. Gently fold the mixture with a spatula or wooden spoon until just combined — try not to overmix. The batter should be shiny, thick, and similar to brownie batter in consistency.
- Portion the Batter: Spoon the batter into your prepared mini muffin tin, filling each cup about two-thirds of the way. Use the back of the spoon to level the tops if needed. Sprinkle a few flakes of sea salt on each tortelet for a finishing touch.
- Bake: Place the tin in the preheated oven and bake for 10 to 12 minutes. The edges should look set and slightly firm, while the centers may still appear soft — that’s exactly what you want. The residual heat will continue to set them as they cool.
- Cool & Enjoy: Let the tortelets cool in the tin for about 5 minutes before gently removing. Serve warm for a gooey interior or let cool completely for a firmer, more truffle-like bite.

Tips:
- These tortelets store well — keep them in an airtight container at room temperature for up to 2 days, or refrigerate for a firmer texture that lasts up to a week.
- For extra indulgence, drizzle with a little melted dark chocolate, or swirl in some tahini or nut butter before baking.
- No mini muffin tin? Use a regular muffin tin and double the bake time — just keep an eye on the centers.
- If your olive oil is strong and peppery, reduce slightly and replace a tablespoon with a neutral oil for balance.
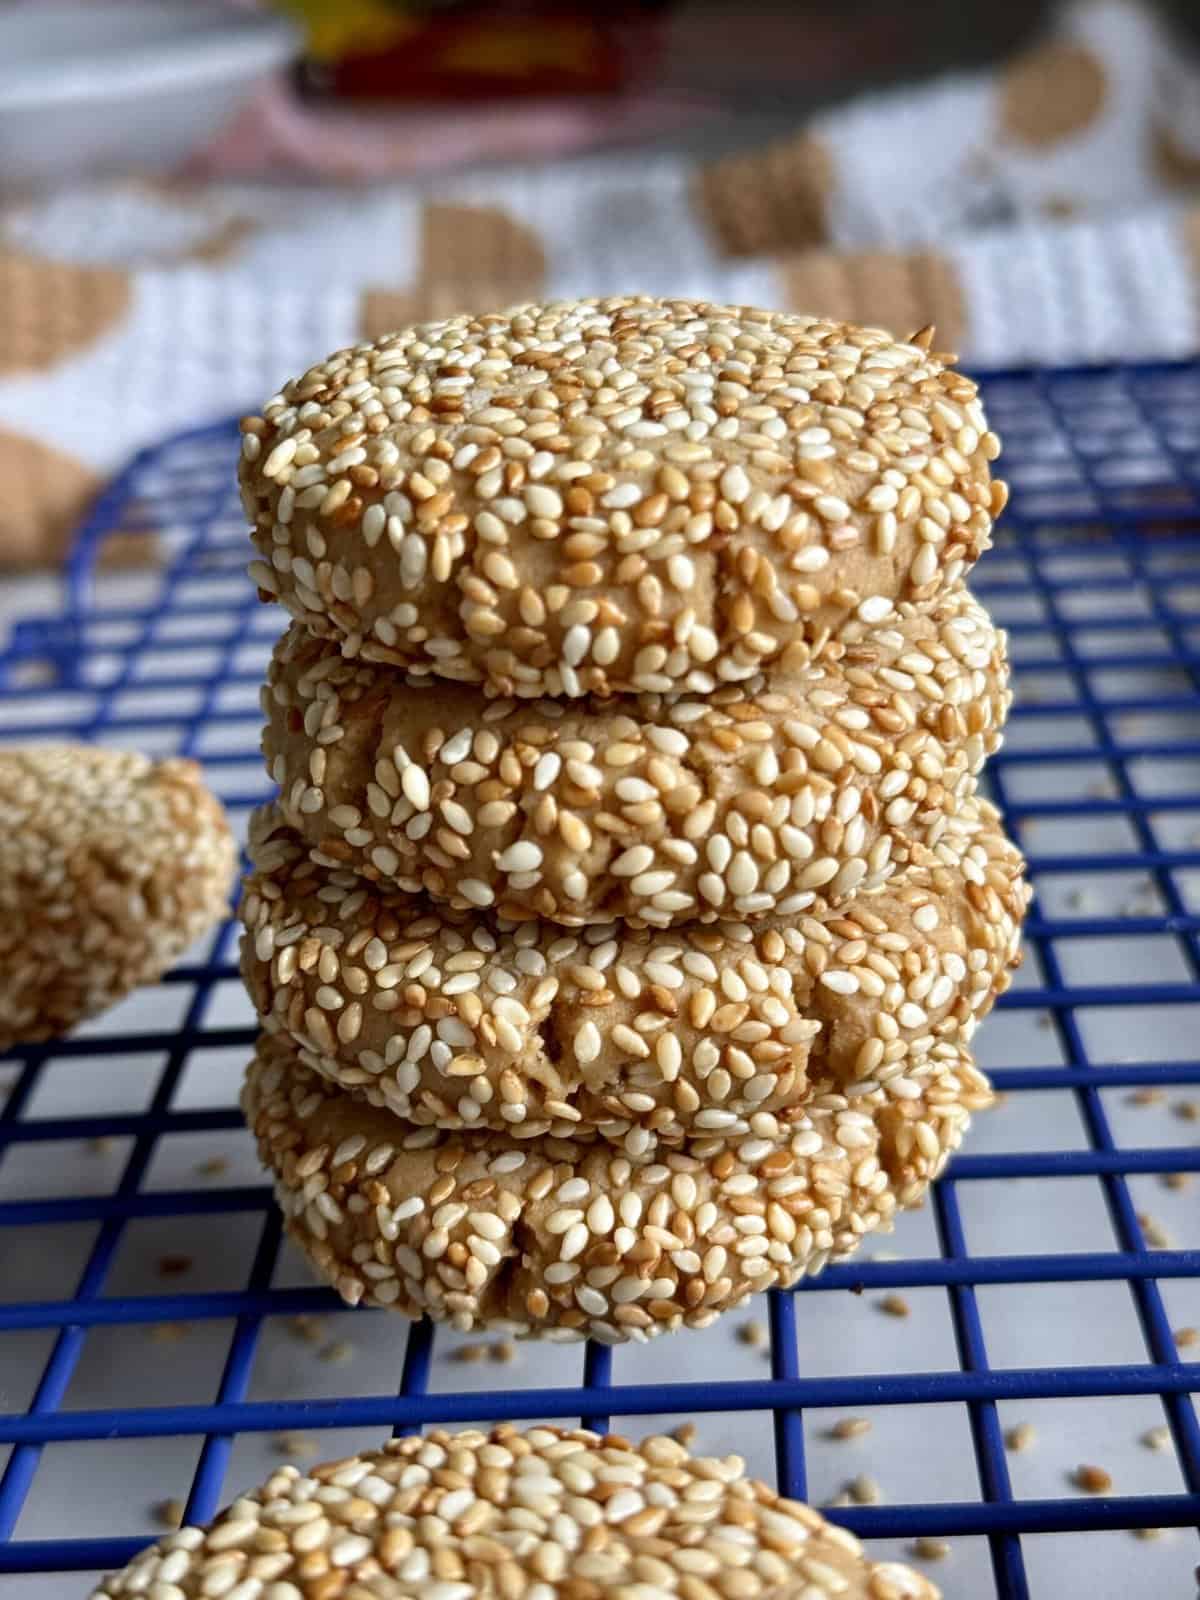
Honey Tahini Snack Cake with Sesame Sugar Crust
Savory-sweet, globally inspired, shockingly simple
This quiet little cake doesn’t beg for attention — but it earns it with every bite. The tahini adds subtle depth and richness, the honey brings a floral, natural sweetness, and the sesame-sugar crust gives each square a delightfully crisp top. It’s the kind of low-effort bake that feels unexpectedly elegant, whether you’re sneaking a square at 10 a.m. or serving it alongside tea for company.

Ingredients:
Instructions:
- Preheat & Prep: Preheat your oven to 350°F (175°C). Lightly grease a 9×5″ loaf pan or an 8×8″ square pan. If using parchment paper, leave a slight overhang on the sides for easy removal later.
- Combine Wet Ingredients: In a medium bowl, whisk together the tahini and honey until fully blended — the mixture will look glossy and thick. Add in the egg, oil, and milk. Whisk vigorously until smooth and cohesive, with no streaks remaining.
- Incorporate Dry Ingredients: Sprinkle the baking powder and salt over the wet mixture. Stir briefly, then add the flour. Mix just until combined — avoid overmixing to keep the texture tender and cake-like.
- Transfer & Top: Pour the batter into your prepared pan, using a spatula to smooth the surface evenly. In a small dish, stir together the sesame seeds and sugar. Sprinkle this mixture evenly over the top of the batter to form a crisp, nutty crust as it bakes.
- Bake: Place the pan on the center rack of your oven and bake for 25–30 minutes. You’ll know it’s ready when the edges are golden, the sesame crust is toasty, and a toothpick inserted into the center comes out clean or with a few moist crumbs.
- Cool & Slice: Allow the cake to cool in the pan for at least 15 minutes before slicing. If using parchment, lift the cake out and transfer to a cutting board. Slice into squares for snacking or bars for sharing.

Tips:
- For a luxurious variation, fold in small chunks of halva or a handful of chopped dates just before baking.
- Add a pinch of cinnamon or cardamom to the batter for subtle warmth and extra depth.
- Store leftover cake covered at room temperature for up to 3 days, or refrigerate for a slightly firmer texture and longer shelf life.
- This cake pairs beautifully with black coffee, masala chai, or fresh mint tea — perfect for slow afternoons.
- If your tahini is on the thicker side, warm it slightly before mixing for smoother blending.
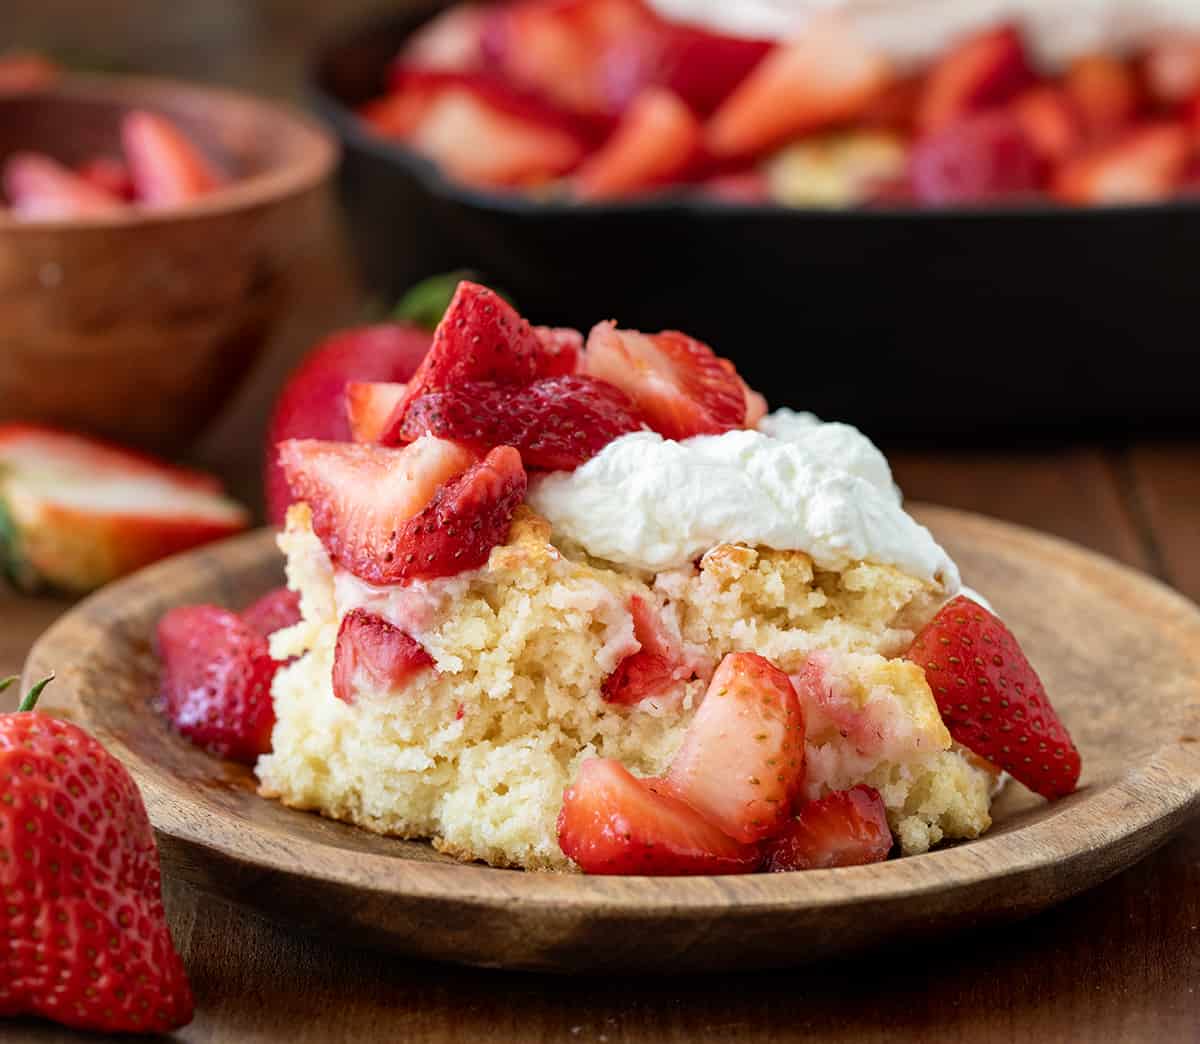
Roasted Strawberry Skillet Shortbread
Rustic but refined — like a farmers market bake sale exclusive
This sweet little number is what you’d bake if your favorite orchard stand turned into a cozy coffee shop for the weekend.
With a rich, buttery crumb (despite being oil-based!), golden edges, and juicy roasted berries tucked into every bite, this
shortbread-meets-cake creation is the kind of unfussy summer bake that looks — and tastes — like it came from a vintage cookbook.
No mixer needed. Just one bowl, one pan, and a few peak-season strawberries.
:max_bytes(150000):strip_icc()/9110310-bdc80dd8796845b8884241cadf747756.jpg)
Ingredients:

Instructions:
- Preheat & Prep: Set your oven to 350°F (175°C). Lightly grease a 9″ cast-iron skillet or an oven-safe metal pan with a touch of oil.
No skillet? You can use an 8×8″ square pan instead — just know you’ll miss out on those crispy, caramelized skillet edges. - Mix Wet Ingredients: In a medium mixing bowl, whisk together the egg and sugar until lightened in color and slightly foamy.
Pour in the oil and continue whisking until fully blended and glossy. - Fold in Dry Ingredients: In a small bowl, mix the flour, baking powder, and salt. Add this dry mix to your wet ingredients and stir gently until just combined.
The batter will be thick but spreadable — avoid overmixing to keep it tender. - Spread & Arrange: Scoop the batter into your prepared skillet and use a spatula to press and smooth it evenly across the bottom.
Arrange your halved strawberries on top, cut-side up, nestling them lightly into the surface. Don’t crowd them — a bit of spacing gives you that jammy-roast effect. - Bake: Place the skillet in the oven and bake for 25–30 minutes. You’re looking for golden edges, a lightly cracked top, and strawberries that look roasted and slightly sunken.
A toothpick inserted should come out clean or with a few moist crumbs — not batter. - Cool & Serve: Let the shortbread cool in the skillet for at least 15 minutes. Slice directly from the pan or remove and transfer to a board.
Serve slightly warm for peak comfort, or let cool to room temp for neater slices.
Tips:
- Out of strawberries? Sub in halved cherries, blueberries, or even peach slices for seasonal variety.
- Want more flavor? Add 1/2 tsp vanilla or almond extract to the batter, or sprinkle the top with lemon zest before baking.
- For a crisp sugar finish, dust the top with turbinado sugar right before baking.
- This shortbread keeps beautifully — store loosely covered at room temp for 2 days or refrigerate for up to 4.
- Serve with whipped cream, crème fraîche, or a scoop of vanilla ice cream for dessert-mode — or with coffee for a rustic breakfast treat.
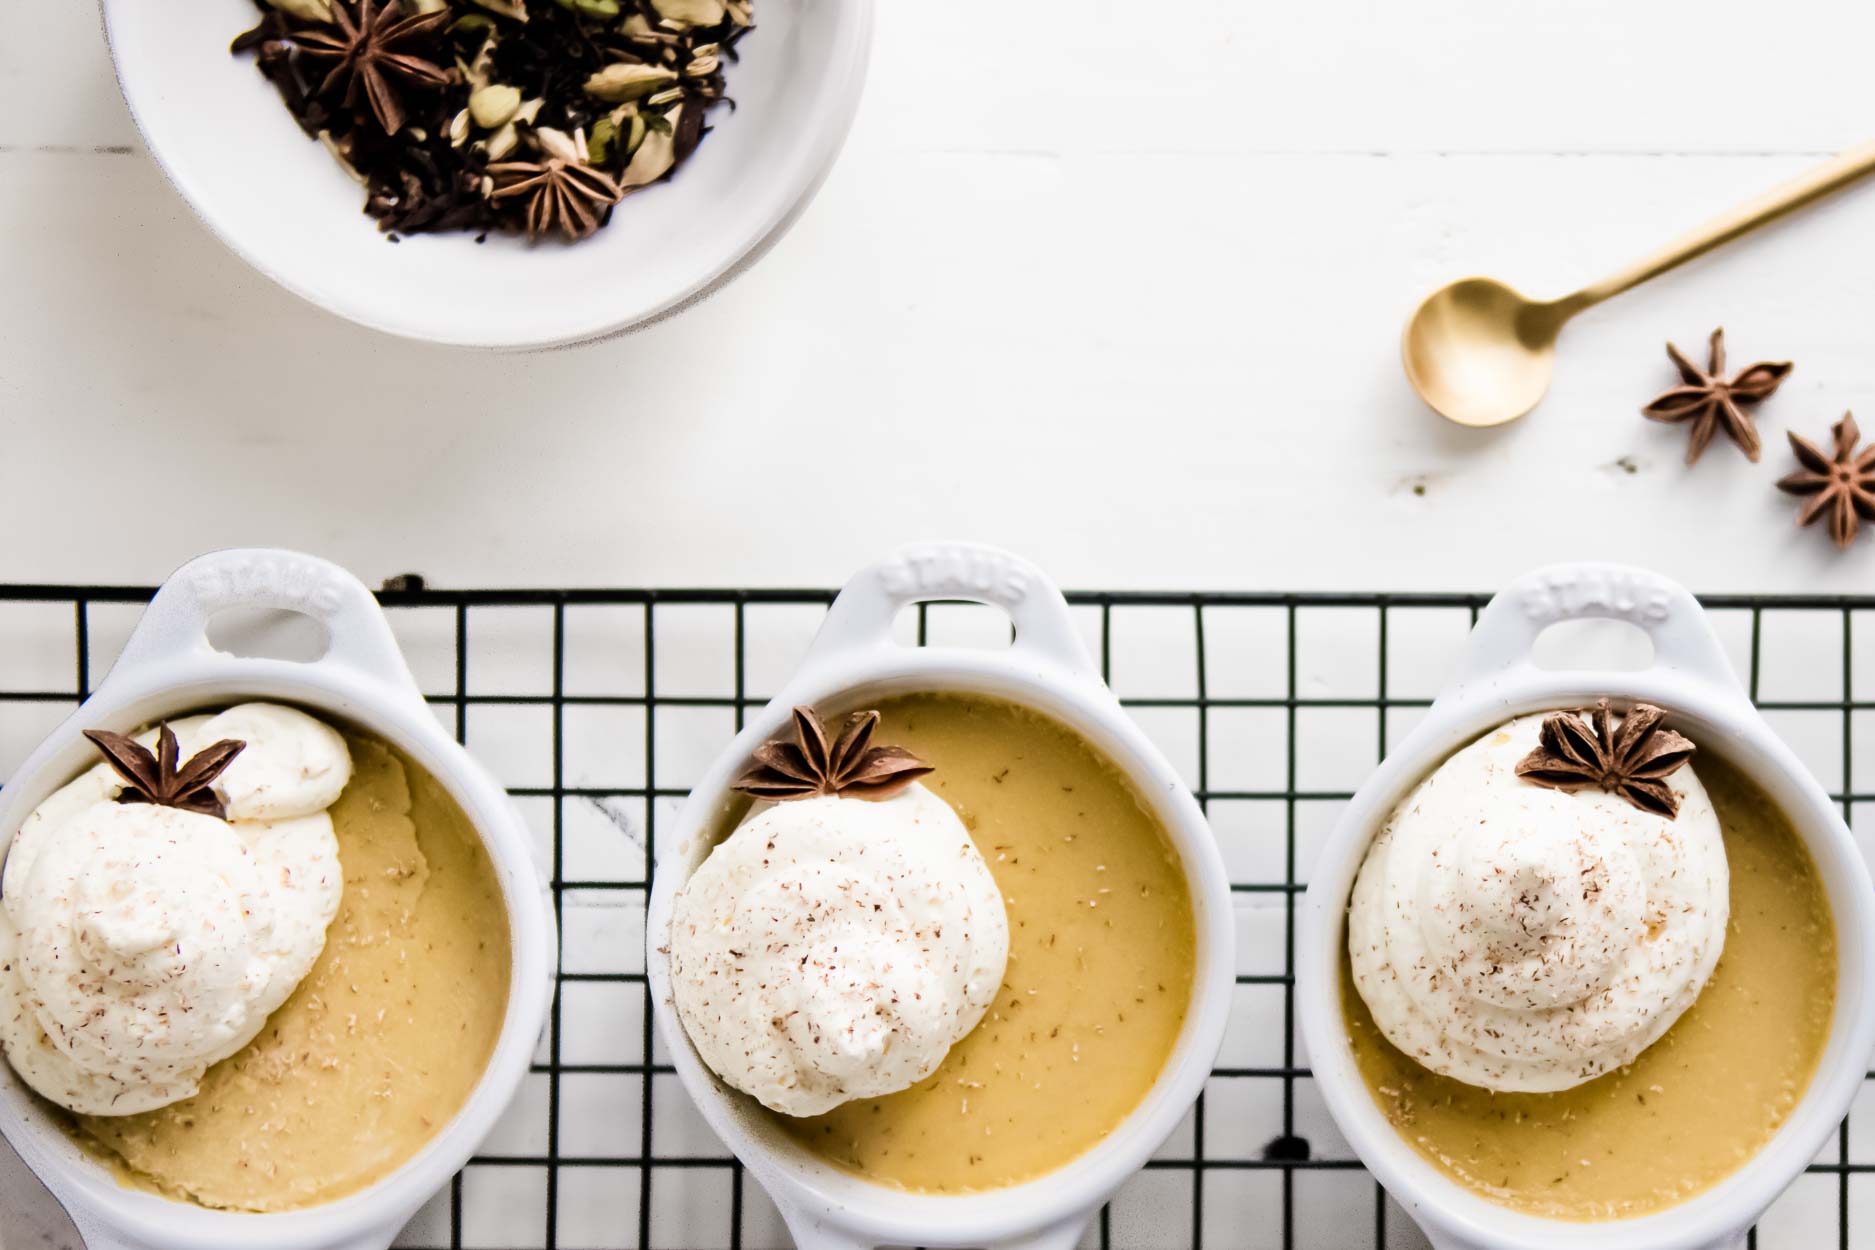
Coconut Milk Chai Sticky Spoon Cake
Tender, pudding-like, and secretly simple
This is the kind of dessert you curl up with when it’s raining out and your to-do list can wait. Silky coconut milk meets
strong brewed chai in a gently spiced spoon cake that bakes up somewhere between a soufflé, a custard, and a dream.
No special equipment, no layers, no fuss — just a few pantry ingredients and one mixing bowl. Comfort is served.
Ingredients:
Instructions:
- Preheat & Prep: Heat your oven to 350°F (175°C). Lightly grease 2–4 ramekins, oven-safe mugs, or small baking dishes.
Place them on a baking sheet to make handling easier. - Mix the Wet: In a medium bowl, whisk together the cooled steeped chai, coconut milk, sweetener (sugar or honey), and egg.
Make sure the chai is cool enough not to scramble the egg. - Fold in Dry Ingredients: Add the flour, baking powder, and a pinch of salt. Stir until the mixture is smooth and silky — it should resemble a pourable cake batter.
- Portion & Bake: Divide the batter evenly between the prepared ramekins. Place the baking sheet in the oven and bake for 20–25 minutes,
or until the tops are puffed and slightly golden around the edges. The centers should still have a little jiggle — that’s your spoonable magic. - Serve Warm: Let the cakes rest for 5 minutes, then dig in with a spoon straight from the ramekins.
Top with a dollop of yogurt, whipped coconut cream, or a light dusting of cinnamon for extra cozy points.
Tips:
- Upgrade the flavor with a splash of vanilla extract or a bit of orange or lemon zest stirred into the batter.
- Want an ultra-gooey center? Take them out 2 minutes early and serve immediately — they’ll be extra soft and custardy.
- These also reheat well in the microwave for 20–30 seconds if you want to prep them ahead for later comfort.
Ingredients:
Baking
- 1 cup Strawberries
- 4 Eggs
- .25 cup Milk
- 2 cups All-Purpose Flour
- 1 cup Granulated Sugar
- .33 cup Cocoa Powder
- 1.25 tsp Baking Powder
- Salt
Flavor
- .33 cup Olive Oil
- .33 cup Vegetable Oil
- .33 cup Honey
- .33 cup Tahini
- 1 tsp Vanilla Extract
- 1 tbsp Sesame Seeds

Ingredients are subject to availability at local stores. Unavailable items will be automatically substituted at best-effort.